Ballasting 101
by Dave NeffThere have been umpteen articles written on the topic of ballasting in all model railroad venues for half a century---so why not the umpteenth plus one! Going further, N scale (and also Z scale) has its own ballasting peculiarities because of the smaller size. Certainly there are many different methods of track ballasting that can work well. Recently I held a little ballasting session on my layout upper deck mainline with colleagues Bob Gittinger and Randy Hahn, and so herewith are my techniques which we employed.
Preparation. First we start out with the track and roadbed. I have code 55 track, and use the Woodland Scenic black foam roadbed. I spray painted the rails with Floquil Rail Brown, wiping off the rail tops as I went with a wet cloth. Then, since I don't use black ballast, I hand-painted the black foam roadbed bevel with a dull gray. I use #50 Smith and Son gray blend ballast which looks about right from a size standpoint. Previously I had used #40 and that is a bit too coarse. Several years ago I used a finer ballast from Highball or someone else and it looks too fine (you can see it on my layout around the Slatyfork Sawmill complex).
Next, I discovered a new product at the national convention in Grand Rapids last year---a powdered glue which you mix with the ballast. I's called Track-Tack It. The glue is brownish, so when dry mixed you have a three-color mottled effect, but after misting it dries clear. After spreading the ballast/glue mixture over the track, you simply mist the ballast and let dry for 24 hours. What a concept! No more spreading of white glue with an eye dropper!
Applying and Shaping the Ballast. We simply
used a spoon to deposit the ballast inside the rails over a section length
of about 12-18 inches. Then we used soft bristle artist brushes
(see photo)
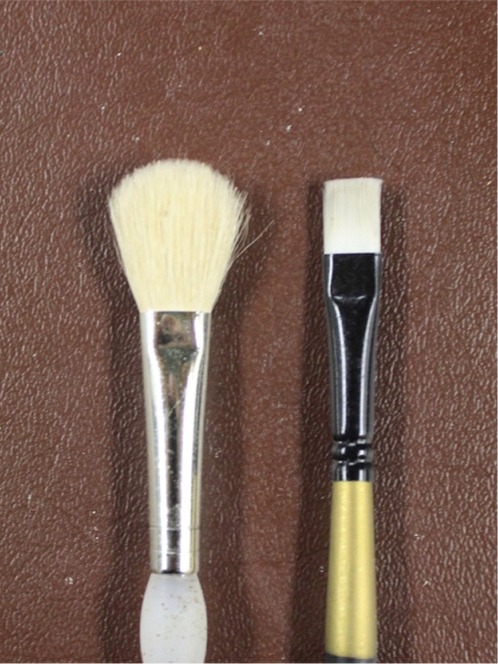
click to enlarge
to work the ballast. (Don't use the standard one inch hard
bristle brush named in many ballasting techniques because it is too easy
to flip ballast away from where you want it with the hard bristles.)
Brush the ballast within the rails so that just the top of the ties is showing.
The ballast will have spilled over the rails and onto the roadbed shoulder.
Then use the smaller brush shown in the photo on edge over each rail to
further clear ballast from the inside rail where the engine/rolling stock
flanges ride, and to expose the tie tops outside the rail. This will
leave a bit of a ballast ledge or ridge along the shoulder. Then
take the flat portion of the larger soft bristle brush and gently
tamp down this ridge. This full process may require several
repeats until the entire track section with ballast looks right, and requires
a bit of an artist's deft hand and patience!
Turnouts. I'm not sure I've mastered this as yet, but it is extremely important to remove all ballast away from the throwbar mechanism as well as the switch points as the ballast is spread. Use of an awl, a microbrush (fine size), a razor blade, and a hobby knife can help.
Replacing missing ties. There are track sections where ties were previously removed, especially with flex track, in order to place rail joiners. Appropriate width tie sections from track remnants were used with the plastic holders on the web cut off with a sprue cutter and filed down smooth, and then the tie section was placed under the rails in that open spot. A little ballast mixture is applied and spread over this area. While not attached to the rail, after ballasting the inserted replacement ties will look like they belong.
Misting. Start with a fine mister such as a hair spray bottle, use water plus just a drop of detergent, alcohol, or water-wetter in the full bottle. Apply the spray obliquely to the ballasted track from a distance of more than 6 inches on the first pass, just enough to wet the mixture (easily seen visually) without disturbing the ballast. Subsequent passes to thoroughly wet the ballast can then be applied a bit closer to the track. After the section has been thoroughly misted, go over the inside of the track, as well as the rail tops, with a damp cloth to remove stray ballast and to ensure minimal residual glue on these surfaces. On turnouts, carefully clean all ballast away from and wipe the throwbar mechanism and the turnout points, then use a razor blade between the points and stock rails to ascertain full movement. After one hour, repeat the process on the turnouts, and again in a few hours if necessary.
Second Round. What most ballasting instructions don't tell you---and the pristine photos in the mags don't always reveal----is that after the first ballasting, a second application is usually required. When the first coat has fully dried/hardened, there will be a few areas (maybe more than a few) where the ballasting has washed out or is too thin. Easy enough---apply more ballast, brush out again with the edge of the small brush over each rail and the outside tie, then the flat of the larger brush to tamp down on the bevel, and re-mist those areas.
Running Trains. The full test of the ballasting result is to run a train smoothly over the ballasted trackage. This means carefully cleaning the inside of the rail of any residual ballast where the engine and rolling stock flanges ride, as well as the rail tops. I found it useful to wear an Optivisor, use a good light, and an awl to carefully go over the full track to remove stray ballast as I watched an engine traverse the section. Additionally, running a stiff bristle tooth brush, or preferably a brass bristle brush on the inside of the rails is a big help. Following that, going over the rails with a bright boy, a track cleaning car, and Rail Zip is helpful. Lastly, understand that some rail joiners may actually show some corrosion from the misting. Carefully use a scratching or distresser tool to brighten up the joiner, and then perhaps additional soldering may be in order before trains can run well. I may still be at this before our Winterfest meeting night as track maintenance is a forever task and I won't yet at this point guarantee that trains will be running smoothly!
Finally, the ballasting on the roadbed shoulder will not necessarily be even, and there may also be stray ballast particles away from that area. The latter can easily be brushed up and vacuumed. A straighter ballast line on the roadbed shoulder can be obtained by scraping with a suitable tool, or using the aforementioned brass bristle brush, or can even be blended into scenery which will be abutted right up to the shoulder.
As a final touch, after all is said and done and the trains are truly running well, the insides of the rails and the ties can be touched up with a paint pen to re-achieve a brownish look to the inside of the rails and the tops of the ties.
All in all, I'm generally pleased with the results of this ballasting extravaganza and a big thank you to Randy and Bob for their assistance.
Dave Neff
2013